Quantcast
Channel: ArchiCAD 18 – Cadimage Blog
Viewing all 140 articles
Browse latest View live

Looking for Help with Cadimage Tools?

$
0
0

Have you tried searching the Knowledgebase on www.cadimage.com?

Here is a direct link:  http://cadimage.com/Support/KnowledgeBase 

In the Knowledgebase, you will find a range of technical information including:

  • Product overviews
  • Installation instructions and extras
  • Tutorials to help you get started
  • Troubleshooting tips

You might also find our Forums helpful as they contain a range of real-life questions and answers submitted by Cadimage customers.


Tips & Tricks: Extrusions with Objective

$
0
0

Here is a short movie that explains how to create Extrusions with Objective…

extrusions movie

Never miss another Cadimage update…

$
0
0

Many of you have asked to be kept up to date with new releases of the Cadimage Tools, via email.

This is a great idea, however we are aware that too many emails can spoil a good thing. So, if you would like to receive these emails, we request that you:

  1. Log in to your account on My Cadimage ( https://www.mycadimage.com/ )
  2. Go to My Account > Newsletters
  3. Tick the checkbox next to the newsletter titled ‘Cadimage Tool Updates’
  4. Save Changes

This process will add you to the Cadimage Tools Update distribution list. You can also update your newsletter preferences to stop receiving the emails, by simply unchecking the box next to the newsletter name.

The emails will be sent only when there is a new release, and we’ll also include the Changelog so you can see what’s new.

Set default for Keynote labels

$
0
0

Keynotes is now smarter with how you set defaults. Double click a Keynote within the Keynote Palette and open the Label settings:

KNTsettings

Here you can set what information is shown, text size and font, frames etc. Once set place your Keynote.

Now if you hold ALT and pick up the properties of that Keynote Label all other Keynote Labels will be formatted the exact same way

If your hardware key (keyplug / dongle) changes…

$
0
0

Some of you out there are probably having your green WIBU key plugs replaced with new CodeMeter or Software Keys (or you already have).

As you may know, your Cadimage Tools license is associated with your ArchiCAD license number, so when you change licenses for ArchiCAD, you’ll need to re-activate your tools too.

To do this, just send us an email (support@cadimagegroup.com) to let us know which license number(s) you are moving, and we can setup the license changeover.

Graphisoft File Converter packages update…

$
0
0

Graphisoft have recently updated the File Converter for ArchiCAD 10 to support the WIBU (green) key replacement and introduction of soft keys.

The converters can be downloaded from here:  http://www.graphisoft.com/downloads/fileconverter.html

More information on File Converters is available in this post:  http://blog.cadimage.com/2015/05/opening-old-archicad-projects/

Can’t find a Marker on plan?

$
0
0

How many times have you gone in to an old project looking for a Section, Elevation or Detail Marker and struggled to find it on plan?

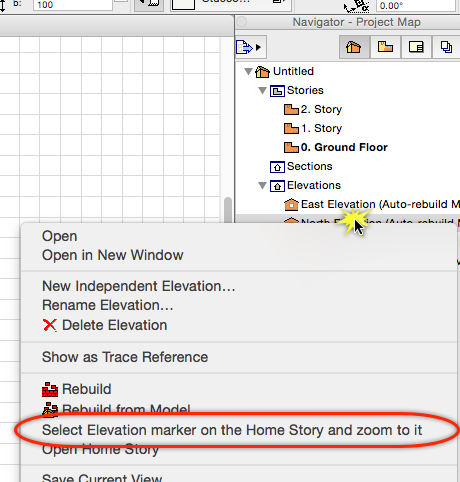
There is actually a very simple way to do this… right click in the Navigator (Project Map or View Map) on the Marker you are looking for and then click on the Select Elevation marker on the Home Story and zoom to it option…

find marker

Multiple default options for Keynote Labels

$
0
0

Label Styles is a feature at the very bottom of the Keynotes Palette allowing you to set different defaults for your Keynotes.

You just set up the Keynote as you want it and choose ‘New Style':

KNTstyle1

Give it a name and that is stored and used from now on:

KNTtyle2

You can then add another style and choose as you place notes how you want you Keynote formatted

KNTstyle3


Change what you can see in the 3D window

$
0
0

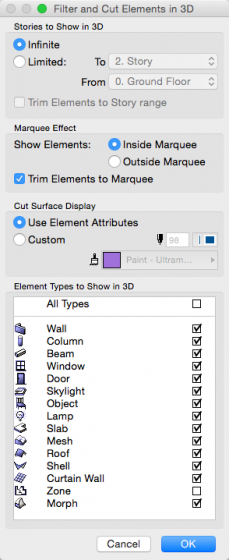
Sometimes it is necessary to filter the visible elements in the 3D Window to improve performance or restrict the elements for exporting data.

The Layers within ArchiCAD will allow some flexibility here – but they will not for example allow you to hide the Doors or Windows (in ArchiCAD, Doors and Windows belong to their parent wall and as such do not have a layer).

To do this we use Filter Elements in 3D available from View> Elements in 3D View> Filter and Cut Elements in 3D…

filter 3d

There are other settings that also allow you to control the visible stories and marquee behaviour.

Want to see what colours look like on paper?

$
0
0

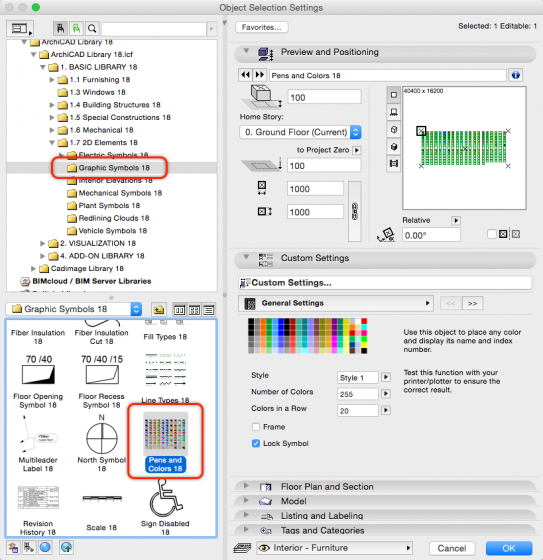
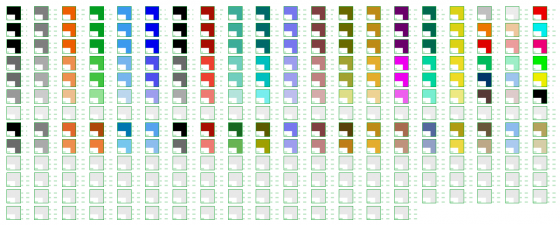
Have you ever found the colours on screen don’t look quite like the colours you output on paper?  Well, without going in to display configuration, a simple thing you can do is use this great Object and print a version of your pen palette so you know what the colours will be like on your device(s).

You can find the Object in Graphic Symbols 18> Pens and Colors 18 as highlighted below:

pens and colours 00

I configured mine to have the same columns as the Pen dialogs in ArchiCAD so it looks as follows:

pens and colours 01

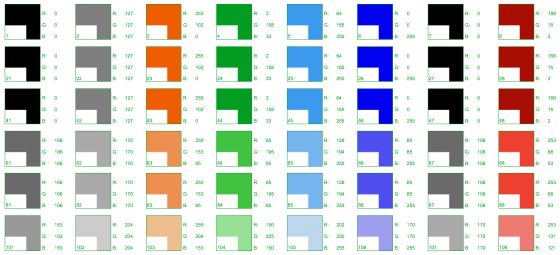
…and if you look closer you will see the Pen Number and RGB values:

pens and colours 02

If you switch to Style 2 it will also draw a section of line so you can see the thickness of the pen.

How big is a room?

$
0
0

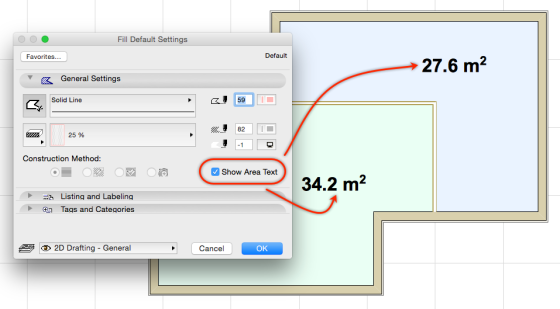
If you want to quickly work out and show the area of a space all you need to do is draw a Fill and activate the Show Area Text option…

area text

Column for Key in Keynote Schedule

$
0
0

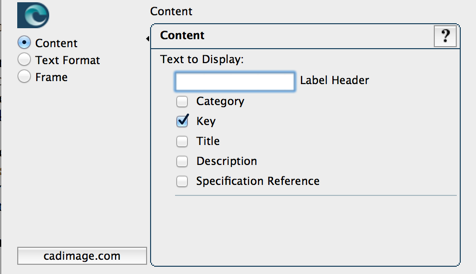
There is a very small option in the Keynote Schedule object which can make a big difference to the appearance of your schedule.

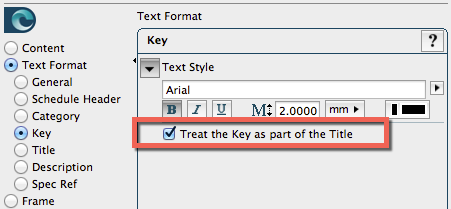
Within the settings under Text Format>Key there is a checkbox for ‘Treat the Key as part of the Title':

KNTschedulekey

If this is turned on the Keynotes will be formatted as paragraphs with the Key followed by a space and the Title.

However if this is unticked the Key will below in its own dedicated column making them easier to location and all the Titles & Descriptions will stay in their separate column also.

Monitor your model in 3D

$
0
0

If you have a project that you find particularly slow to navigate or work in 3D this may be due to the model having a large number of polygons.

Polygons are the 2D shapes that are pieced together to form a 3D model… and there can be a LOT of them in a model.  A simple straight wall has 6 polygons… inside, outside, top, bottom, end one and end two.  Now think how many polygons are in a curved window for a few mullions, transoms and stone cill!  And now multiply this across a whole building… quite quickly, the numbers add up!

Fortunately, Graphisoft provide a handy polygon counting tool that can display the number of polygons in a model… it even breaks them down in to element types such as doors, windows, slabs, walls etc.  The Polycount Tool, and other Goodies, are available after selecting your localised ArchiCAD 18 version here:  http://www.graphisoft.com/downloads/goodies/index.html

There is also an archive available for older versions and instructions are included with the download link.

Launch a new instance…

$
0
0

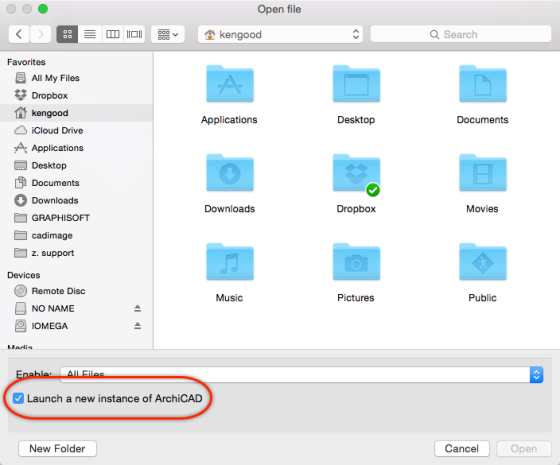
If you are working in a project and want to check something in another file – don’t go through the hassle of closing, opening, closing and reopening… all you need to do is choose File> Open and then pick the Launch a new instance of ArchiCAD option…

launch new instance

This option is also available with New and Teamwork projects

What layer is my element on?

$
0
0

The easiest way to check what layer is being used is by selecting the element and looking at the Layer field in the Infobox

infobox layer


ArchiCAD – Master Only Layer

$
0
0

The ArchiCAD – Master Only Layer was created by the Cadimage Tools in ArchiCAD 17 before for the Cadimage Keynotes Tool. This is no longer required in ArchiCAD 18 as the Keynotes Tool now has a smarter way of handling its placement and style.

Previously you would place a placeholder object on each Master Layout on this Layer and the Tool would turn this Layer off in all Layouts then create a separate object on a different Layer for each Layout, complicated right?

Now you do not need to place any object on your Master Layout. You just place on schedule on a Layout, it will go to the top-left location by default. Now you can move, edit and format this schedule as you require. This can just go on the ‘ArchiCAD Layer’

Every other schedule you create will use the same settings as the first one you created without the need for a master object or layer!

Collate in Schedule: Invert wall direction

$
0
0

One of the reasons why a Door or a Window may not be collating in a schedule could be related to the wall it’s placed into.

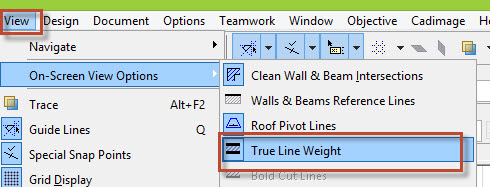
Go to the menu View>On Screen View Options> Wall and Beams Reference lines.

11-06-2015 12-01-00 p-m-01
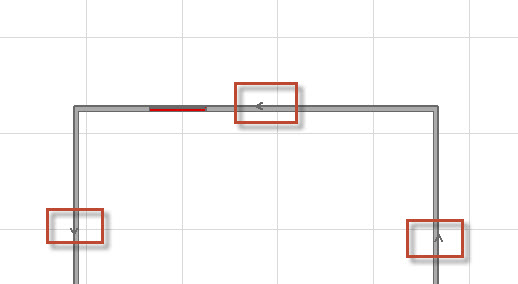
Then you will see the walls arrow direction

11-06-2015 12-08-18 p-m-01


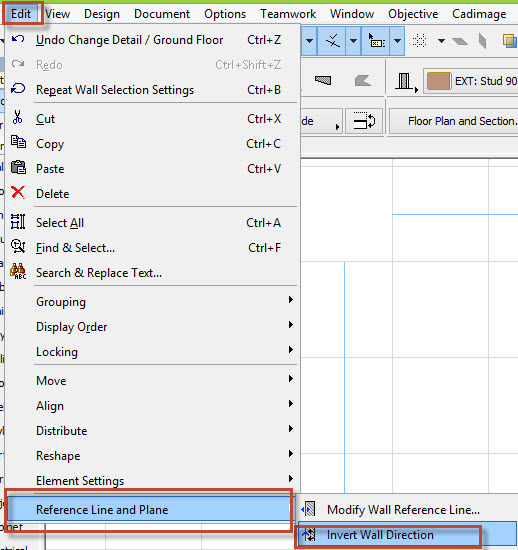
If you see the walls that belong to the Doors that aren’t collating it’s possible that the direction of one of the walls is going in the opposite direction, if that is the case you can select that wall, go to the menu

Edit>Reference Line and Plane> Invert Wall direction.

11-06-2015 12-10-08 p-m-01
Once both walls are going in the same direction, updating the schedule may collate the doors this time.


Change what the Tracker can show

$
0
0

Did you know the Tracker can show more than the usual few visible items?

The example below shows the typical display of the Tracker whendrawing a wall…

typical tracker

However, if you click the button highlighted below you can see the additional functions…

tracker additional settings


Manage your Attributes…

$
0
0

Most tools in ArchiCAD rely on Attributes. Attributes include Pens, Line types, Fills, Surfaces and so on. All attributes that already exist are managed by the Attribute Manager. Over time and as you become more experienced with ArchiCAD you will begin to create your own attributes; more than likely you are already in the form of layers. Because attributes remain in the files they are created in, you may find that you want to transfer specific attributes into another project.

To access your attribute manager go to Options > Element Attributes > Attribute Manager

Here you will find tabs relating to all of the attributes held within the ArchiCAD file you have open. (Layers, Pen Sets, Line Types, Fill Types, Surfaces etc..)

To save an attribute or multiple attributes out of the file for use in another you will need to organize the attributes you want to save.

Using an example, we might have made a Surface material which we put a lot of time into and renders very well, however, it is currently only in the file we created it in. Ideally we would have that Surface material ready to go in our Office template so whenever we started a job we had it there for use.

image

To do this you need to go to the Surface tab, select your Surface material from the left hand column and choose Append, which will transfer it into the right hand column. You can now choose Save As and save the file externally.

Now open your destination file e.g. Office Template and access the attribute manager as above. Choose Open from the Attribute Manager. Choose your saved file and Append the material into your new file.

Background fill for Doors and Windows

$
0
0

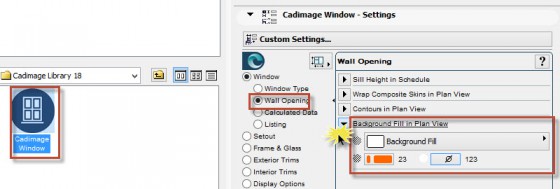
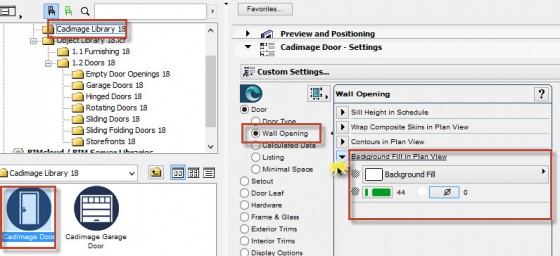
Find the Cadimage Door or Window opening background here:


11-06-2015 12-19-22 p-m-01

11-06-2015 12-20-48 p-m-01


Viewing all 140 articles
Browse latest View live